
Whenever I walk through a vegetable market or grocery store, I end up spending extra time inspecting all the different types of peppers available for purchase. Some stores offer a nice selection, and I adore looking at all the different shapes and shades of the peppers.
I usually end up buying a big bag of each kind of pepper and then going home and pickling them all so that my pantry will be stocked with a large variety of flavors and colors to choose from as an addition to meals.
Learn more about Pascale's Kitchen here>>
With the second group of peppers, I like to make my favorite pickled roasted peppers with salt and olive oil. With the third group of large bell peppers, I often prepare stuffed peppers.
In North African cuisine, which includes dishes originating in Libya, Tunisia, Algeria and Morocco, you’ll find endless recipes for salads and spreads made from peppers. There’s a wide variety of flavors ranging from sweet to spicy, some of which can be prepared quickly and others that need to cook for many hours, from peppers that are small and thin to peppers that are large and thick. Some are quite similar to each other, and yet the discerning palate can differentiate between all the wonderful flavors. And, of course, depending on how you cook the peppers, you will end with very different results. Some are chopped very finely and others are mashed. Each salad has its own unique seasoning. Some families like to add varying amounts of garlic, caraway seeds, salt and pepper. Some even like to add a bit of cumin. And yet, overall, most of the recipes for pepper salads resemble each other with slight differences.
Below, you will find two recipes for pepper salads that were a staple in my family when I was a young girl. We especially loved to scoop up the spread with soft, fresh challa or homemade bread that was brought to the table straight from the oven. If all we had was bread leftover from the day before, we would toast it and then let it soften under the weight of the delicious pepper salad. In one single bite you get a rush of spicy and salty flavoring that melds with the crispiness of the bread.
I’ve also included a recipe for my favorite sourdough bread, which is the perfect bread to serve with the pepper salads.
MARINATED ROASTED BELL PEPPERS IN OIL (ASHLAYA)
½ kg. spicy red peppers
½ kg. green peppers
1½ cups olive oil or vegetable oil
2/3 cup salt
Rinse the peppers and then roast them on a wire rack over an open flame. Alternatively, you could place them on a baking tray and broil them in the oven at a very high temperature. Remove the blackened skin with a knife and rinse. Dry the peppers. Spread the salt out on a flat plate or tray. Dip the peppers in the salt and then lay them out on a plate. Continue placing another layer of peppers on top of the last one until you’ve used all the peppers. Press them gently so they are all squished together. Place another plate on top of the peppers and then let them sit on the counter overnight.
Transfer the peppers to a large, airtight container and pour the oil on top. Keep in a dark place for 2-3 weeks until they’re ready to eat.
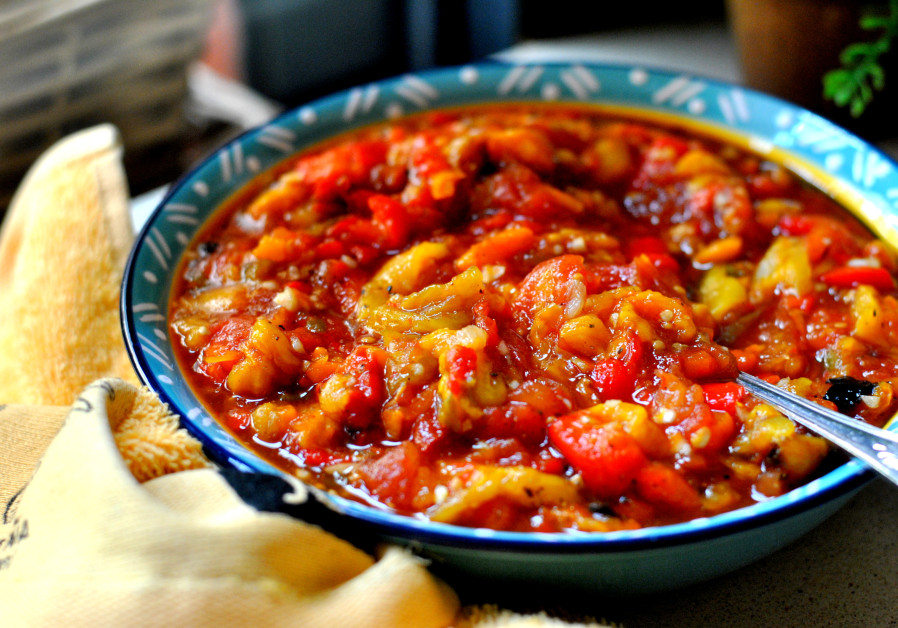
ROASTED PEPPER AND TOMATO SALAD
1 green pepper
4 spicy green or red peppers
4 tomatoes
8 cloves of garlic, chopped finely
3 Tbsp. fresh lemon juice
2 Tbsp. oil
½ tsp. salt
Cut the top of the pepper off and get rid of all the seeds. Rinse them well. Place a metal rack over a medium flame and place the vegetables on the rack. Roast them until the outer skin blackens and bubbles.
Remove the skin with a knife or by hand. Chop the vegetables with two sharp knives, one held in each hand, or just cut them into small pieces.
Place in a large bowl and add the rest of the ingredients – the garlic, lemon juice, oil and salt. Mix well and serve cold.
SOURDOUGH BREAD
500 gr. white flour
200 gr. rye flour
150 gr. sourdough rye starter or other sourdough starter
½ cup oat bran or ¼ cup ground flax seeds
½ cup sesame seeds
½ cup sunflower seeds
2½ cups water
1 Tbsp. salt
For work surface:
Flour or corn flour
Place the flours and sourdough starter in the bowl of an electric mixer fitted with a dough hook and mix on low speed. While mixing, add all the different kinds of seeds, then slowly add the water. Mix for 3 more minutes and then add the salt. Continue mixing for 8-10 more minutes. Flour a large bowl and place the dough in it to rise. Cover with plastic wrap and let it rise for 60-90 minutes.
Take the dough out of the bowl and punch out all the air. Knead the dough by folding it over from the edge into the middle. Cover and let it rest for 1 hour.
Separate the dough into two balls and let them rest another 20-30 minutes. Form the balls into the desired loaf shape and place in a basket lined with a cotton towel that was sprinkled with flour or corn flour. Cover and place in the fridge for 12 hours.
Heat your oven to medium temperature and place inside it a baking stone or a cast iron pot. Let it heat for 30 minutes.
In the meantime, place a sheet of baking paper on your work surface. Place the loaves of dough on the paper and sprinkle a little flour on top of them and then make any desired changes to the shapes of loaves. Make cuts in the dough with a sharp knife. Take out the iron pot that has been heating in the oven and using the baking paper, place the loaf of dough inside of it. Cover the pot. Increase the temperature to 250°C and bake for 20 minutes. Remove the cover and continue baking for another 15-20 minutes until it turns golden brown.