
Now that it’s hot out, I try to limit the amount of time I spend in the kitchen preparing weeknight dinners. But what can we do – it’s always nice to having some fun foods around to serve to guests or eat with the family. That’s why it’s helpful to have some homemade crackers and spreads prepared ahead of time, so you can just grab them out of the fridge/pantry and enjoy a tasty, healthy snack.
Here are a few recipes you can prep ahead of time that have an extremely long shelf-life, so they can be enjoyed again and again.
The crackers are really easy to prepare, but if you’re short on time, just buy a package of your favorites, and then all you’ll have left to do is prepare a batch of a spread like tehina or pesto. Now, you may be asking yourself: Aren’t these spreads also widely available in grocery stores? Yes, they are, but since they are so easy to make at home with a few simple ingredients, wouldn’t you rather make something yourself that you can adapt to your individual tastes and to which you can add all sorts of delectable extras?
So, what kind of fresh produce should you buy? I recommend purchasing seasonal fruit – for the summer, that means peaches, grapes, watermelon, berries and cantaloupe – as well as colorful vegetables, such as peppers and cherry tomatoes. I love to buy a basket of mixed-color plum and cherry tomatoes, and recently I came upon small green cherry tomatoes that were slightly sour but also still sweet, which at first I thought were grapes. Next to them I found lots of differently colored sweet bell peppers that taste amazing mixed together with spicy peppers. And, of course, you can add herbs such as lemon verbena, thyme, mint and two different colors of basil.
Take the biggest cutting board you can find or a large tray and add little bowls of all the various spreads you prepared ahead of time. Add a big plate of homemade (or store-bought) crackers. In between all these bowls, add the colorful fresh fruits and vegetables. You can cut up some of them and drizzle a little lemon juice on top so they don’t turn brown. Push in as much as you can so that the tray is super crowded with all of this beautiful, healthful, delicious food, then set it down in the middle of the table in your dining room, garden or balcony, and get ready for all the compliments to come.
Matziot / Galette
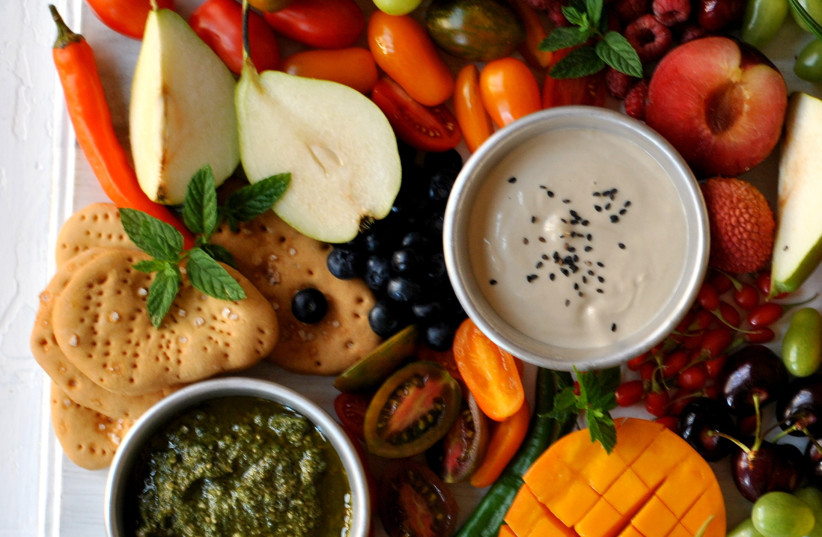
These crackers, which hail from Tunisian cuisine, are similar to regular crackers, except they are a little wider and flatter, and are traditionally served at kiddush on Shabbat morning. They are made from bread dough that is rolled out super thin. Before you place them in the oven, you can stretch them a tiny bit more and then make holes in them using the tines of a fork and sprinkle with kosher salt.
Makes 25-30 crackers.
4½ cups flour, sifted
1 Tbsp. fresh yeast
2 Tbsp. oil
1½ cups water, at room temperature
A bit of salt
3 Tbsp. kosher salt
Place the flour in a large bowl. Sprinkle the salt on top and then form a well in the center. Add the yeast and then gradually add the water while kneading the dough. Continue kneading the dough until it’s well mixed. Cover and let the dough rise for 30 minutes.
Flour your work surface and then roll out the dough until it is 1-cm thick. Cut out circles or squares and then make holes in the dough with the tines of a fork. Sprinkle with kosher salt. Place the dough circles or squares on a greased baking tray.
Bake in an oven that has been preheated to 180° for 20 minutes or until the crackers turn golden brown.
Level of difficulty: Easy
Time: 1 hour
Status: Pareve
Salty crackers with sesame seeds
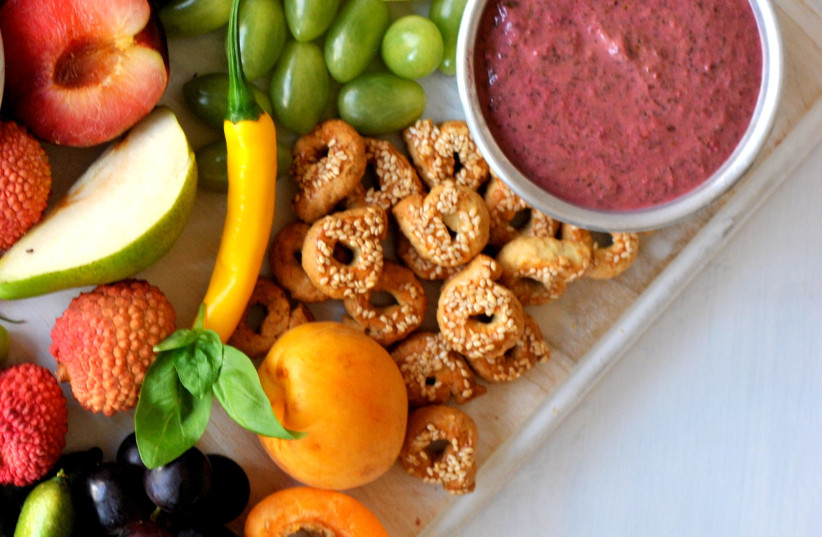
This recipe hails from North African and Mediterranean cuisine. It’s best to prepare a large amount, as they last a long time if stored in an airtight container. Serve with a cup of hot tea or coffee.
Makes 100 very small crackers.
1 kilo flour, sifted
200 g. sesame seeds
3 tsp. salt
3 tsp. sugar
2 packets of baking powder
2 tsp. ground caraway seeds
¾ cup oil
50 g. margarine, softened
2½ cups water, at room temperature
Toppings:
1 egg, beaten
½ cup sesame seeds
Add the flour, sesame seeds, salt, sugar, baking powder and caraway seeds to a large bowl and mix well. Gradually add the margarine and water alternately, while kneading the dough. Knead the dough until it falls away from the side of the bowl. Let the dough rise for 90 minutes.
Line a few baking trays with baking paper and grease them. Take a bit of the dough and flatten into a circle with a diameter of 1.5 or 2 cm. Prepare the rest of the crackers in the same fashion. If you prefer, you can prepare circles with a diameter of 5 cm, or thin sticks that are 12-15 cm long.
Arrange the dough pieces on the baking trays with space between them. Brush with beaten egg and then sprinkle sesame seeds on top. Alternatively, you can place the sesame seeds in a bowl. Brush the dough with the egg wash and then dip the dough pieces in the sesame and arrange on the baking tray with space between each one.
Bake in an oven that has been preheated to 180° for 20-25 minutes or until they turn golden brown. Let them cool completely and then store in an airtight container.
Level of difficulty: Medium
Time: 2.5 hours, including rising
Status: Pareve
Tricolor tehina
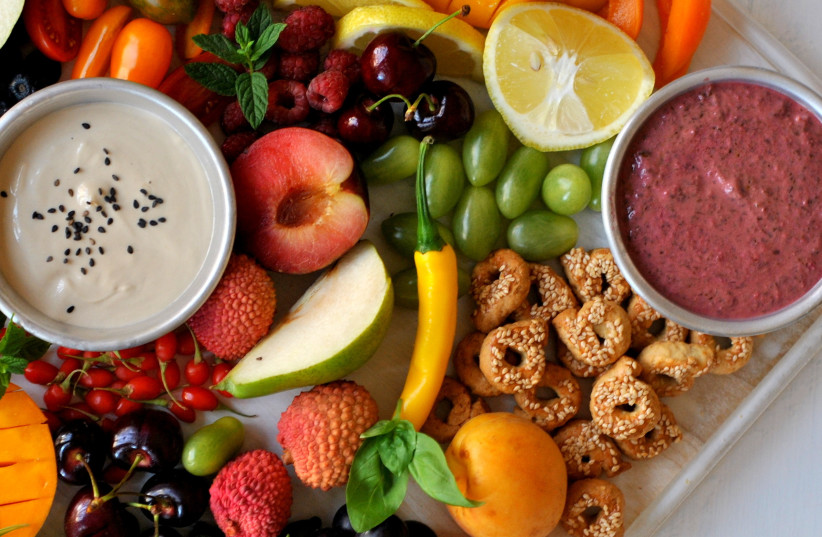
Basic tehina has a light tan color, which you can alter by adding various vegetables. For example, you can make purple tehina by adding cooked beets, or red tehina by adding roasted bell peppers.
Makes 8-10 servings.
1 cup high-quality raw tehina
Salt and pepper, to taste
Juice from 1 or 2 lemons, depending on level of sourness you desire
1 cup water
8 medium cloves of garlic, crushed
Topping:
Black sesame seeds
For purple tehina, add 50 grams (or more) of cooked and peeled beets
For green tehina, add 1 bunch of parsley, chopped finely and 8 stalks of mint, chopped finely
Place the tehina, salt, pepper and lemon juice in a bowl. Mix well. Gradually add the water while mixing until you’ve reached the desired texture. When the tehina is ready, you can sprinkle some black sesame seeds on top.
To prepare purple tehina, add the pieces of cooked beets to a blender together with the prepared tehina and blend until smooth. If you’d like it to be even darker purple, you can add more pieces of beets and blend again.
To prepare green tehina, add the parsley and mint to the prepared tehina and mix well. Taste and adjust seasoning.
Store the tehina in an airtight container in the fridge.
Level of difficulty: Easy
Time: 5-10 minutes
Status: Pareve
Pesto
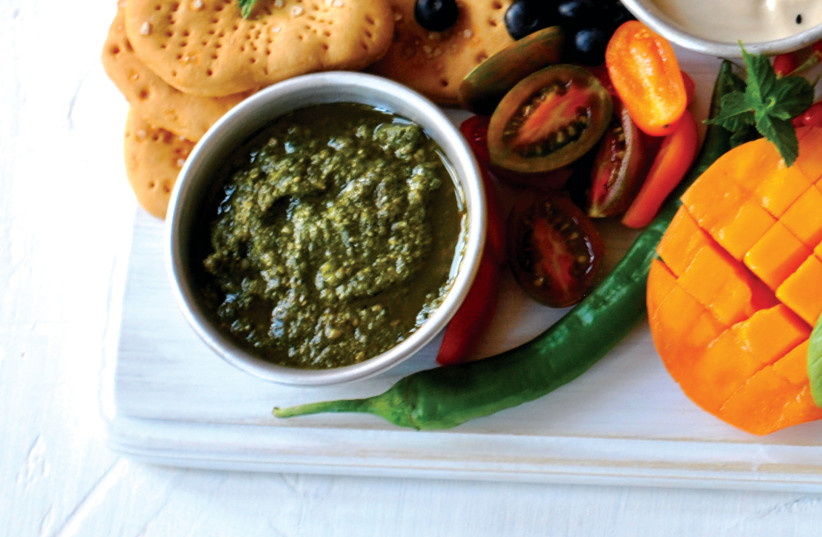
Pesto, which hails from Italian cuisine, is so rich in flavor that it has been adopted by many cultures far and wide. It is great eaten with roasted vegetables or crackers. One of the best things about pesto is that you can easily adapt it to your own culinary preferences.
Makes one small jar.
Leaves from 1 stalk of basil, without stems
2 cloves of garlic
¼ cup olive oil
¼ cup walnuts or pine nuts, roasted
¼ cup Parmesan cheese, grated (optional)
Blend the basil leaves in a blender. Gradually add the rest of the ingredients until smooth.
Store in a jar in the refrigerator.
Level of difficulty: Easy
Time: 15 minutes
Status: Dairy
TiPascale:
You can mix the ingredients with an electric mixer instead of kneading by hand if you prefer.
You can prepare the dough a day ahead of time and store in the fridge until you’re ready to prepare the crackers.
If you prepared a large amount, you can store some of the crackers in the freezer.
Translated by Hannah Hochner.